Blogs
Compiling Sway with wlroots from source (+ Nix shell)
I used this process when I needed to compile the latest commit of Sway to test a new feature, and my distro (NixOS) didn’t have the required wlroots version packaged so I needed to compile that from source too. With the correct clangd setup in your editor, autocomplete/intellisense for sway & wlroots will both work flawlessly. Disclaimer: This isn’t official; there may be better ways to do it (feel free to ping me on the original gist). With that out of the way, here are the steps I used:
wlroots
- Clone:
git clone https://gitlab.freedesktop.org/wlroots/wlroots
- Obtain deps
Use your system’s package manager to obtain all of the dependencies listed here. A Nix shell which accomplishes just that is at the bottom of this post.
- Setup build & Compile
--prefixtells Meson to use a newoutsubdir as the prefix path (for.soand.hfiles ) instead of the default/usr/local-Doptimizationis to avoid compiler errors from Nix’s fortify flags (alternatively use Nix’shardeningDisable = [ "all" ];)
meson setup build -Ddebug=true -Doptimization=2 --prefix=/home/<user>/dev/wlroots/build/out
ninja -C build install # installs headers and shared object files to the previously specified prefix
Sway
- Clone:
git clone https://github.com/swaywm/sway/
- Obtain deps
Use your system package manager again (or the Nix shell at the end of this post). Sway’s build deps are listed here
- Setup build & compile
The fun part:
PKG_CONFIG_LIBDIR="/home/<user>/dev/wlroots/build/out/lib/pkgconfig/" meson setup build -Ddebug=true -Doptimization=2
# ^ tells Meson to look for wlroots in our previously specified location
ninja -C build
Nix shell
Running nix develop with this shell.nix in your CWD will add all of the
listed dependencies to your environment without installing them to your system.
{ pkgs ? import <nixpkgs> { }, ... }:
pkgs.mkShell {
  name = "wlroots";
  packages = with pkgs; [
    # Wlroots deps
    libdrm
    libGL
    libcap
    libinput
    libpng
    libxkbcommon
    mesa
    pixman
    seatd
    vulkan-loader
    wayland
    wayland-protocols
    xorg.libX11
    xorg.xcbutilerrors
    xorg.xcbutilimage
    xorg.xcbutilrenderutil
    xorg.xcbutilwm
    xwayland
    ffmpeg
    hwdata
    libliftoff
    libdisplay-info

    # Sway deps
    libdrm
    libGL
    wayland
    libxkbcommon
    pcre2
    json_c
    libevdev
    pango
    cairo
    libinput
    gdk-pixbuf
    librsvg
    wayland-protocols
    xorg.xcbutilwm
    wayland-scanner
    scdoc

    # Build deps
    pkg-config
    meson
    ninja
  ];
}
How to control external monitor brightness in Linux
Do you have an external monitor? Do you want to change it’s backlight brightness, but hate having to reach to fiddle with it’s awkwardly placed and unintuitive button interface?
Me too! Thankfully, there’s a widely supported protocol called Display Data Channel (DDC) based on i2c that lets us solve this problem in a nice way. It allows for communication between a computer display and a graphics adapter - things like setting color contrast, getting model name/date information, and of course, setting backlight brightness.
Control displays using ddcutil
To manually query or change monitor settings from the command line, install the ddcutil program. Use it to detect which of your monitors are ddc-capable with:
ddcutil detector to set backlight brightness with:
ddcutil setvcp 10 $BRIGHTNESS -b $I2C_BUSwhere 10 corresponds to the backlight brightness setting, and $I2C_BUS is the
unique i2c ID given to your monitor (/sys/bus/i2c/devices/i2c-{n}) which
should be reported to you by ddcutil detect.
This process is definitely not ideal though; scripting ddcutil is
quite
painful
(trust me on that) and prone to errors (running multiple commands too quickly
causes “communication failed” errors!) Plus, nobody wants to manually detect and
set bus ID’s!
Furthermore, none of the other cool brightness control software or modules (like Waybar’s backlight module) will work with your monitors. Thankfully, there’s a better solution!
ddcci-driver-linux
Linux has a standard “display brightness” interface (which is what’s used by all
the brightness control software), in which each display is given a
/sys/class/backlight/ entry for programs to interact with. To make this work
with external ddc-capable monitors as well as regular laptop displays, one
simply needs a program that bridges the gap between linux’s interface
(/sys/class/backlight/) and ddc commands (/sys/bus/i2c/devices/i2c-{n}).
Which is exactly what the
ddcci-driver-linux
kernel module does!
Upon proper installation of the ddcci-driver-linux kernel module, one will find
/sys/class/backlight/ddcci{n} directories for each capable external monitor.
Now any backlight program will work with them!
Nvidia sucks
Unfortunately, Nvidia graphics cards can cause some trouble. Since the graphics adapter (in the case of an Nvidia GPU, Nvidia’s drivers) is required to do the messaging with capable monitors, it is responsible for some of the ddc-capability detection. And of course, Nvidia’s implementation of that is known to be faulty/broken.
If ddcutil doesn’t detect your monitors, try
these workarounds. If the ddcci-driver-linux
kernel module doesn’t create the necessary /sys/class/backlight/ entries, try
this workaround
(I implemented it in my NixOS configs
here).
A Website? Explained.
When it comes to building and making things, I almost never feel satisfied without knowing how said thing works under the hood. A personal website is no different. In fact, I put off this project for so long for just that reason; I knew how much I didn’t know about the web, and knew that I wanted to learn it all properly instead of skimping out for some existing already-built-for-you solution.
I had never properly worked with the web before; things like how JavaScript frameworks work, what a web server does, or how SSL certificates are granted were all things I knew I would need to learn.
This article serves as a documentation of that process, and an explanation of the choices I made that led me to this website. I find that writing stuff like this down is the best way to make it stick. But it anyone else also somehow finds it useful, great!
Note: As my motivation came more from the desire to learn than to make a production-ready and maintainable system, my decisions may seem unsensible or borderline rediculous to experienced web people. Deal with it :P
The Backend
I started with the backend, figuring out how I would host the website, and learning the basics of how web hosting works in the process. I knew I didn’t want to use anything automatic with too many details hidden (e.g. Vercel), so I opted to find a cloud server that I could get access to for free (no trials) that I could host my website on manually.
After some searching, I found that the Oracle Cloud Always Free tier has the best free options out of any provider. So I got a VM of the shape that was available, and began installing software.
I opted for using the Nginx webserver, as it offers very low level and complete control over the webhosting, and is very efficient (and seemingly better than Apache at this point).
For SSL certs, I chose to use CertBot, which uses the LetsEncrypt certificate authority (this decision didn’t last - more on this later!). It was a relatively simple process, but it involved installing more software and many specific steps, commands, and configurations.
In the back of my head, as I continued to make all these small changes and additions that are impossible to remember, I knew I would regret not using something more reproducible (Docker, Nix, Bash scripts, etc). I knew that if I ever had to switch server providers or rebuild the system from scratch for any reason, I would have to relearn many small details all over again. But I continued on for the time being, to at least get to the point of hosting a webpage (I’ll get back to this later too).
After many many hours of:
- configuring firewalls, iptables and DNS records
- learning the Nginx syntax and its capabilities
- finally understanding file permissions in Linux
- installing SSL certs with CertBot
- many failed attempts at fixing the SELinux security layer before I finally gave up and disabled it
I finally had a default landing page hosted on my domain. The next order of business:
The Frontend
I have only ever worked with raw HTML and JavaScript, and barely even any CSS. I knew however that I would want to write blogs in Markdown, and that I would want at least some extra capabilities and QOL features than what you get from just those basics. So I began to search for Static Site Generators (SSGs) and frameworks that I might want to use. Some things I looked for:
- I don’t need lots of functionality, but I like a high complexity ceiling (aka opt-in complexity)
- No rediculous abstractions; I still want to understand the entire system and compilation process
- Preferably lightweight, minimal to no client-side JS
- Fast compilation / build time
Out of those preferences, I found myself quite liking the approach that Astro takes. It allows for fully opt-in client-side JavaScript, is very simple to start with but allows for practically unlimited complexity (even mixing and matching any other JavaScript frameworks together), and has extremely well designed features, such as content collections. I spent a long long time over-analyzing and not able to make the final decision on what to use (there are far too many options), but eventually I just decided to go with it.
During the frontend design process, I learned that tinkering and perfecting with tiny details is quite addicting; enough to significantly increased the amount of time it took for me to finish putting the website together. Many hours of productivity have been accidentally lost to those details. It’s a lot easier to mess with paddings and drop-shadows in CSS than it is to think about what to write! I guess it’s something good to know about myself :p
As I continued to develop the website though, I had a realization. I now had access to a server fully capable of hosting my website, and my website design in development. But how was I going to connect them? How was I going to take the build ouput and transfer it over to the server?
Connecting the Frontend and Backend
I had to figure out a good way to transfer the website files to the server. Should I build the site locally or on another platform and copy that output to the server’s web-root directory manually after every update? Should I build the website on the server itself and constantly poll for updates in a loop?
After some thinking, I came up with these desires:
- Source code for the website should be hosted on GitHub, but the build
process should NOT tied into it
- Simple webhooks are OK - most git forges should have them
- GitHub Actions are NOT OK - they’re too rooted into GitHub, and hides too much of the process
- The website is built separately from my computer, on the server itself
- All I should have to do to trigger the rebuild and deploy process is a
git push
I found out that GitHub (not surprisingly) provides a quite convenient webhook
interface, allowing reposity owners to configure webhooks that get triggered
upon different events that occur within the repository (such as a new commit or
a push). This works perfectly for my case, as I can have the hosting server
listen for said webhooks and begin the rebuild process when they’re received,
which only requires me to run a git push to start the process! The only
difficult part left is figuring out how to make the webhosting server actually
listen for those webhooks.
A GitHub webhook can send to any IP or URL on any port, as a POST request with specific data and headers. Coming into this, I had absolutely no idea how I could make a computer listen for requests, or what that even really looked like or meant. Do you need a separate application for it? Is it common to have a public-facing server listen for random POST requests on an open port?
What I did know is that I already had an Nginx server running that was listening for POST requests, but for the website. So naturally, that was the first place my brain went to look for potential answers. But as I was too impatient to scour StackOverflow to decide if this was a good train of thought, I decided to have a (what turned out to be very long and detailed) conversation with ChatGPT about it! (that link contains a large portion of the conversation)
I was blown away by ChatGTP’s ability to understand my problem, and especially
with its knowledge surrounding Nginx and its syntax. After a lot of
conversation, I ended up with another Nginx server block—in the same config
file I was already using for webhosting—to listen for the webhook POST requests
and pass them to a “webhook server” running on port 3000 (something that parses
the requests and can then execute commands depending on them):
proxy_pass http://localhost:3000;.
At first, it recommended me to use a simple Bash script with NetCat as the “webhook server”, to listen to and parse the requests. That wasn’t an ideal solution though, due to many limitations and NetCat’s barebones-ness. So I searched online for other webhook servers, and found 2, both written in Go and hosted on GitHub. One had more recent commits, but the other had far more stars and popularity and has a GitHub Webhook configuration already built in, so I went with that one.
The webhook server I picked turned out to be very helpful and easy to work with. I copied the default GitHub Webhook configuration available in the repo, tweaked some parameters and added my secret field (basically an encrypted password), and set it to run my rebuild bash script (which I would show if not for security concerns). All the script has to do was pull the latest updates from my websites GitHub repo, rebuild, and copy the output to the webroot folder. And bam, I had a working connection between the front end source code and the backend hosting server!
An over-engineered diagram of the setup at this stage (I got carried away with Excalidraw lol):

The Backend, Revisited (Dockerization)
At this point, I had configured and installed more things on the Oracle Cloud server than I could count. I knew that it would become a problem, as if at any time I would have to switch the server hosting platform or rebuild the system for any reason, I would have to figure it all out again. Installing tons of packages and software, configuring iptables, installing SSL certs, configuring file permissions for Nginx and its webroot, and working with but finally disabling SELinux. It was a lot.
Sensing my future regret, I decided to rebuild as much as I could of the setup in a Docker container, using what I’d learned so far to make it much more reproducible and understandable. This of course had to begin with learning Docker and its basic usage, but that went by fairly quick. More importantly, I had to figure out how I was going to combine the three main/difficult components of the setup:
- Nginx, and its configuration
- The Webhook server
- Requesting and Installing SSL Certs
Nginx & Webhook Server (1 & 2)
This part was easiest; I started by using the officially supported Golang container to build Webhook manually. Then, utilizing Docker’s Multi-Stage builds (where you take stuff from one container to build the final one, leading a smaller final image), I copy the webhook binary into a fresh nginx container. Now all I had left to work out was SSL certs - the hardest part.
SSL Certs (3)
What makes the SSL certs more annoying is that you don’t want to re-request the certs from the certificate authority every single time you restart the container - it’s a very long process. It’s typical to wait to refresh your SSL certs for around 60 days, or even longer. This meant I would need to use a Docker Volume to keep the certificate files persistent between runs of the container.
I quickly learned that CertBot (which also forces users to install it as a Snap package :|) was not going to be ideal. Instead, I found acme.sh, a (posix shell compliant - no bash needed) shell script that can do everything CertBot can but better, plus a lot more.
Acme.sh has two main subcommands that are needed for issuing certs:
acme.sh --issue, and acme.sh --install-cert. The issue command contacts the
CAs and requests the certs, which is the long process that you don’t want to
repeat. The install command just takes the certs that have already been
received, and does something with them - in my case, I have configured it to
simply copy them into a location where Nginx can read them.
In order to get certificates from a CA, they need to verify that you have
control of the domain. There are many methods to do this, and acme.sh comes
with 8 (as of writing), but the most common of them is called “Webroot mode.”
By giving acme.sh write-access to your webserver’s webroot folder
(/usr/share/nginx in my case), the CA can verify that you own the domain by
requesting acme.sh to add a file somewhere under the root (usually under
/.well-known/acme-challenge/). When the CA then requests for that specific file,
if your webserver is set up correctly, it should receive it, and therefor know
that you own the domain.
Challenges Automating SSL Certs (3)
The above strategy works well and good, except for a problem that arises when attempting to automate the process in Docker: My Nginx configuration is set to host the webroot under https only; i.e., I don’t host anything without encryption. So how is Nginx supposed to host the file that acme.sh generates to request the SSL certs, without there being any SSL certs yet!
My solution: A super minimal, http-only Nginx configuration that is used just
to request the SSL certs. Once they have been received and installed, Nginx will
then be reloaded with the full https-only configuration. The amount of
complexity here made me move the logic into a separate init_container.sh
script, which then becomes the ENTRYPOINT of the docker container.
Here’s (another over-engineered) diagram of the setup for automatically generating and renewing SSL certs within the Docker container:
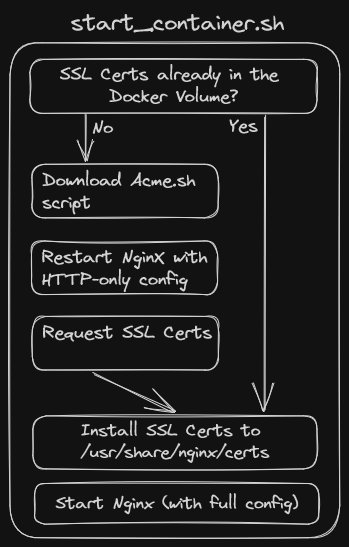
Results
And, bam! If you’re reading, that’s because the setup is working.
Ignoring the fact that what I have now is a likely unmaintable, definitely overly-complicated and unnecessarily custom system, this is a success :P.
Most importantly, I learned a shit ton of stuff throughout the process. That’s what it was about anyways. There might be one or two other people that ever read things I post or appreciate the effort put into this site. That’s not really what I’m doing it for. It’s for myself and for fun—and that I have achieved :)